
A tour of git: the basics
2.0 Copyright
This document is a modified version of a document originally titled "Distributed revision control with Mercurial" and originally authored by Bryan O’Sullivan. The original document was obtained from http://hgbook.red-bean.com/.
Copyright © 2006, 2007 Bryan O’Sullivan.
This material may be distributed only subject to the terms and conditions set forth in version 1.0 of the Open Publication License. Please refer to Appendix D for the license text.
As this is a modified version, the name of Bryan O'Sullivan is used only to properly credit him with the original text. The appearance of his name here explicitly does not assert or imply his endorsement of this modified document.
Portions Copyright © 2007 Carl Worth.
Changes made by Carl include the following:
- 2007-09-27:
- Convert from HTML to markdown source syntax
- Eliminate all content except Chapter 2 and Appendix D
- Eliminate line numbers from examples
- Modified to describe git instead of mercurial
The source of this modified version can be obtained via git:
git clone git://cworth.org/git/hgbook-git
or
git clone http://cworth.org/git/hgbook-git
and can be browsed online
2.1 Installing git on your system
Prebuilt binary packages of git are available for many popular operating systems. These make it easy to start using git on your computer immediately.
2.1.1 Linux
Because each Linux distribution has its own packaging tools, policies, and rate of development, it’s difficult to give a comprehensive set of instructions on how to install git binaries. The version of git that you will end up with can vary depending on how active the person is who maintains the package for your distribution.
To keep things simple, I will focus on installing git from the command line under the most popular Linux distributions. Most of these distributions provide graphical package managers that will let you install git with a single click. The package name to look for is often git, but is sometimes git-core, (due to an unfortunate name with git, meaning GNU Interactive Tools).
Debian
apt-get install git-core
Fedora Core
yum install git
Gentoo
emerge dev-util/git
OpenSUSE
yum install git
Ubuntu
apt-get install git-core
2.1.2 Mac OS X
A git-core package is available through macports. Once macports is enabled, the command to install git is:
port install git-core
2.1.3 Windows
Git has long been available as part of cygwin, and works reasonably well in that environment. Some people find cygwin a particularly inelegant approach to running git and would prefer a "native" solution. To this end, the msysgit project is rapidly putting together a solution including various packages with full installers. These include GitMe, a package to install the entire development environment necessary to work on improving the msysgit port of git, and WinGit, a package for installing just git itself without the development environment, (still in Alpha as of September 2007).
2.2 Getting started
To begin, we’ll use the “git version” command to find out whether git is actually installed properly. Versions 1.5 and newer of git are much more friendly to new users than versions 1.4 and older. If you aren't yet running version 1.5 or newer, it's highly recommended that you upgrade.
$ git version
git version 1.5.3.2
2.2.1 Built-in help
Git provides a built-in help system. This is invaluable for those times when you find yourself stuck trying to remember how to run a command. If you are completely stuck, simply run “git help”; it will print a brief list of commonly-used commands, along with a description of what each does. If you ask for help on a specific command (such as "git help init"), it prints more detailed information. This command expects the "man" program to be available and for the git man pages to be installed.
[XXX: The original hgbook includes the complete output of "hg
help init" at this point. I'm not including the corresponding
"git help init" output as it would be excessively long. The
description alone is quite reasonable, (other than a
not-too-helpful aside about the obsolete git-init-db command),
but it only comes after a full screen's worth of options
details. Might it make sense to have a more summarized help
output for "git help <foo>" than all of the documentation
available for git-<foo>? And perhaps also provide a "git -v
help" similar to "hg -v help" for more?]
2.3 Working with a repository
In git, everything happens inside a repository. The repository for a project contains all of the files that “belong to” that project, along with a historical record of the project’s files.
There’s nothing particularly magical about a repository; it is simply a directory tree in your filesystem that git treats as special. You can rename or delete a repository any time you like, using either the command line or your file browser.
2.3.1 Creating a copy of a remote repository
The "git clone" command is used to create a local copy of a remote repository. This is generally the first git operation you will use when beginning to work with an existing project.
We've assembled a simple repository that will be used in the examples throughout this chapter. Go ahead and clone this repository now so that you will be able to follow along:
$ git clone git://cworth.org/git/hello
Initialized empty Git repository in /tmp/hello/.git/
remote: Generating pack...
remote: Done counting 15 objects.
remote: Deltifying 15 objects...
remote:  100% (15/15) done
remote: Total 15 (delta 2), reused 15 (delta remote: 2)
Indexing 15 objects...
 100% (15/15) done
Resolving 2 deltas...
 100% (2/2) done
If for some reason you are prevented from talking on the git: port, then there is also the capability to clone a repository (less efficiently) over http:
$ git clone http://cworth.org/git/hello
Initialized empty Git repository in /tmp/hello/.git/
Getting alternates list for http://cworth.org/git/hello
Getting pack list for http://cworth.org/git/hello
Getting index for pack 04ecb061314ecbd60fa0610ecf55a1cbf85ea294
Getting pack 04ecb061314ecbd60fa0610ecf55a1cbf85ea294
 which contains a1a0e8b392b17caf50325498df54802fe3c03710
walk a1a0e8b392b17caf50325498df54802fe3c03710
walk 72d4f10e4a27dbb09ace1503c20dbac1912ee451
walk 13ed136b983a9c439eddeea8a1c2076cffbb685f
walk 0a633bf58b45fcf1a8299d3c82cd1fd26d3f48f2
walk db7117a9dd9a6e57e8632ea5848e1101eee0fbde
If our clone succeeded, we should now have a local directory called hello. This directory will contain some files.
$ ls -l
total 4
drwxr-xr-x 3 cworth cworth 4096 2007-09-27 16:40 hello
$ ls hello
hello.c  Makefile
These files have the same contents and history in our repository as they do in the repository we cloned.
Every git repository is complete, self-contained, and independent. It contains its own private copy of a project’s files and history. A cloned repository remembers the location of the repository it was cloned from, but it does not communicate with that repository, or any other, unless you tell it to.
What this means for now is that we’re free to experiment with our repository, safe in the knowledge that it’s a private “sandbox” that won’t affect anyone else.
2.3.2 Creating copy of a local repository
As mentioned above, a repository can be copied through normal file-copying commands. But it's useful to use "git clone" even when just making a local copy of a repository. Using "git clone" will be much faster and will use much less space than a normal copy. In fact, local clones are impressively fast. Go ahead and make a local clone now as follows:
$ git clone hello hello-clone
Initialized empty Git repository in /tmp/hello-clone/.git/
0 blocks

[XXX Git says "empty" here, (presumably from the git-init
part), but shouldn't the command also report the succesful
clone which makes it non-empty? And what the heck does "0
blocks" mean? This is not friendly output.]
In fact, let's make a couple more clones at the same time. This isn't just to drive home the speed and storage benefits of local clones, but we'll use each of these cloned repositories in Section 2.8 when discussing how to move commits between repositories:
   $ git clone hello hello-pull
   $ git clone hello hello-fetch
   $ git clone hello hello-remote
2.3.3 What’s in a repository?
When we take a more detailed look inside a repository, we can see that it contains a directory named .git. This is where git keeps all of its metadata for the repository.
$ cd hello
$ ls -a
.  ..  .git  hello.c  Makefile
The contents of the .git directory and its subdirectories are private to git. Every other file and directory in the repository is yours to do with as you please.
To introduce a little terminology, the .git directory is the “real” repository, and all of the files and directories that coexist with it are said to live in the working directory. An easy way to remember the distinction is that the repository contains the history of your project, while the working directory contains a snapshot of your project at a particular point in history.
2.4 A tour through history
One of the first things we might want to do with a new, unfamiliar repository is understand its history. The “git log” command gives us a view of history.
$ git log
commit a1a0e8b392b17caf50325498df54802fe3c03710
Author: Bryan O'Sullivan <bos@serpentine.com>
Date:   Tue Sep 6 15:43:07 2005 -0700

    Trim comments.

commit 72d4f10e4a27dbb09ace1503c20dbac1912ee451
Author: Bryan O'Sullivan <bos@serpentine.com>
Date:   Tue Sep 6 13:15:58 2005 -0700

    Get make to generate the final binary from a .o file.

commit 13ed136b983a9c439eddeea8a1c2076cffbb685f
Author: Bryan O'Sullivan <bos@serpentine.com>
Date:   Tue Sep 6 13:15:43 2005 -0700

    Introduce a typo into hello.c.

commit 0a633bf58b45fcf1a8299d3c82cd1fd26d3f48f2
Author: Bryan O'Sullivan <mpm@selenic.com>
Date:   Fri Aug 26 01:21:28 2005 -0700

    Create a makefile

commit db7117a9dd9a6e57e8632ea5848e1101eee0fbde
Author: Bryan O'Sullivan <mpm@selenic.com>
Date:   Fri Aug 26 01:20:50 2005 -0700

    Create a standard "hello, world" program
This command prints a record of output for each change to the project that was recorded. In git terminology, we call each of these recorded events a commit.
The default fields in a record of output from “git log” are as follows.
- commit This field consists of a string of 40 hexadecimal characters. This is a unique identifier for referring to particular commits.
- Author The identity of the person who authored the commit. This field consist of two sub-fields for the user's name and email address, (or at least an email-like idenitifer). Note that git also stores a separate "Committer" field for the person who commited the change, (since often an author will email a change to a maintainer that commits it). See below for how to instruct "git log" to display it as well.
- Date The date and time on which the commit was authored, (again stored separately from the date the change was committed). timezone in which it was created. (The date and time are displayed in the timezone of the person who created the commit.)
- commit message The text message that the creator of the commit entered to describe the commit, (generally a one-line summary followed by more supporting text).
The output of the "git log" command can be made more or less verbose by means of the --pretty option. For example, with "git log --pretty=short" the commit identifier will be omitted and only the first line of each commit message will be shown. And with "git log --pretty=fuller", (the name 'fuller' is in contrast to the default --pretty=full), the committer name and dates will be printed in addition to the author name and dates.
2.4.1 Commits, revisions, and talking to other people
As English is a notoriously sloppy language, and computer science has a hallowed history of terminological confusion (why use one term when four will do?), revision control has a variety of words and phrases that mean the same thing. If you are talking about git history with other people, you will find that what we have called a “commit” is often called a "revision". In other systems, a similar notion is referred to as a "changeset". You might even see abbreviations of these terms such as "rev", "change", or even "cset".
While it may not matter much what word you use to refer to the concept of “a commit”, it's important to know how to name “a specific commit”. We have already seen one means of referring to a particular commit, the 40-character hexadecimal string shown by "git log". These commit identifiers are powerful because they are permanent, unique identifiers that always identify the same commit in any copy of a repository. If two users are examining a working directory associated with the same commit identifier, then those two users have precisely the same contents in all files, and exactly the same history leading to that commit.
So there are places where it is often important to archive the complete commit identifier, (perhaps in bug-tracking systems to indicate a specific commit that fixes a bug, for example). But often, in more casual settings, it's more convenient to use abbreviated commit identifiers. Git accepts any unique prefix of a commit identifier, (and for reasonably-sized projects the first 8 or 10 characters are almost always unique).
And unlike the permanent commit identifiers, git also provides transient means of identifying commits. In fact, in day-to-day use of git, you will probably use these names more than commit identifiers. One example is branch names, (such as the default "master" branch in any git repository), or any project-specific branch names such as "stable", "experimental", or "crazy-insane-changes". Git also provides a special name "HEAD" which always refers to the current branch.
2.4.2 Naming related commits
Git offers simple ways to name revisions that are related to particular revisions in the history. One syntax is the ~ suffix which refers to the parent of a commit, or if followed by a number, to the Nth parent. For example, since "HEAD" refers to the most recent commit in the current branch, "HEAD~", refers to the previous commit, and "HEAD~2" refers to two commits back in the history.
Another useful syntax is .. which can be used to specify a range of commits. So "origin..master" specifies everything that has been committed to master since it diverged from origin.
2.4.3 Viewing specific revisions
You can use "git log" to explore the range syntax just introduced. For example, to see a list of the most recent 3 revisions you can use "HEAD~3..", (the destination of the range is implicitly HEAD in this case):
$ git log HEAD~3..
commit a1a0e8b392b17caf50325498df54802fe3c03710
Author: Bryan O'Sullivan <bos@serpentine.com>
Date:   Tue Sep 6 15:43:07 2005 -0700

    Trim comments.

commit 72d4f10e4a27dbb09ace1503c20dbac1912ee451
Author: Bryan O'Sullivan <bos@serpentine.com>
Date:   Tue Sep 6 13:15:58 2005 -0700

    Get make to generate the final binary from a .o file.

commit 13ed136b983a9c439eddeea8a1c2076cffbb685f
Author: Bryan O'Sullivan <bos@serpentine.com>
Date:   Tue Sep 6 13:15:43 2005 -0700

    Introduce a typo into hello.c.
2.4.4 Other log filters
Besides filtering by commit identifiers, git allows you to easily filter the log output according to which files (or directories) are modified by listing them after "--" which is necessary to distinguish commit names from file names:
$ git log -- Makefile
commit 72d4f10e4a27dbb09ace1503c20dbac1912ee451
Author: Bryan O'Sullivan <bos@serpentine.com>
Date:   Tue Sep 6 13:15:58 2005 -0700

    Get make to generate the final binary from a .o file.

commit 0a633bf58b45fcf1a8299d3c82cd1fd26d3f48f2
Author: Bryan O'Sullivan <mpm@selenic.com>
Date:   Fri Aug 26 01:21:28 2005 -0700

    Create a makefile
And "git log" can also filter based on the dates at which commits were created:
$ git log --since="2 weeks ago" --until="yesterday"

[XXX: By default, "git log" displays author dates as "Date"
but then uses commit dates when given a --since option. That
seems like broken defaults to me. Why the inconsistency?]
Another useful option is -n or --max-count which, unsurprisingly, limits the maximum number of commits to be displayed.
2.4.5 More detailed information
While the default information printed by “git log” is useful if you already know what you’re looking for, you may need to see more details of the change, such as the "diffstat" information with --stat:
$ git log --stat --max-count=3
commit a1a0e8b392b17caf50325498df54802fe3c03710
Author: Bryan O'Sullivan <bos@serpentine.com>
Date:   Tue Sep 6 15:43:07 2005 -0700

    Trim comments.

 hello.c |    8 ++------
 1 files changed, 2 insertions(+), 6 deletions(-)

commit 72d4f10e4a27dbb09ace1503c20dbac1912ee451
Author: Bryan O'Sullivan <bos@serpentine.com>
Date:   Tue Sep 6 13:15:58 2005 -0700

    Get make to generate the final binary from a .o file.

 Makefile |    2 ++
 1 files changed, 2 insertions(+), 0 deletions(-)

commit 13ed136b983a9c439eddeea8a1c2076cffbb685f
Author: Bryan O'Sullivan <bos@serpentine.com>
Date:   Tue Sep 6 13:15:43 2005 -0700

    Introduce a typo into hello.c.

 hello.c |    2 +-
 1 files changed, 1 insertions(+), 1 deletions(-)
Or perhaps you'd like to see the actual patch content of each change, which you can get with -p. That commit with the word typo in its name looks suspicious, so let's take a closer look. Remember that we can name it as master~3, HEAD~3, or any prefix of its commit identifier, (such as 13ed136b):
$ git log -p -n 1 13ed136b
commit 13ed136b983a9c439eddeea8a1c2076cffbb685f
Author: Bryan O'Sullivan <bos@serpentine.com>
Date:   Tue Sep 6 13:15:43 2005 -0700

    Introduce a typo into hello.c.

diff --git a/hello.c b/hello.c
index ed55ec0..80b260c 100644
--- a/hello.c
+++ b/hello.c
@@ -11,6 +11,6 @@

 int main(int argc, char **argv)
 {
-       printf("hello, world!\n");
+       printf("hello, world!\");
        return 0;
 }
Of course, wanting to see all this information for a single commit is such a common operation that it's given its own name in git, "git show". So "git show 13ed136b" is a much easier way to get exactly the same output:
$ git show 13ed136b
commit 13ed136b983a9c439eddeea8a1c2076cffbb685f
Author: Bryan O'Sullivan <bos@serpentine.com>
Date:   Tue Sep 6 13:15:43 2005 -0700

    Introduce a typo into hello.c.

diff --git a/hello.c b/hello.c
index ed55ec0..80b260c 100644
--- a/hello.c
+++ b/hello.c
@@ -11,6 +11,6 @@

 int main(int argc, char **argv)
 {
-       printf("hello, world!\n");
+       printf("hello, world!\");
        return 0;
 }
2.5 All about command options
Let’s take a brief break from exploring git commands to discuss a pattern in the way that they work; you may find this useful to keep in mind as we continue our tour.
Git has a consistent and straightforward approach to dealing with the options that you can pass to commands. It follows the conventions for options that are common to modern Linux and Unix systems.
- Most options have long names. For example, as we’ve already seen,
the “git log" command accepts a
--max-count=<number>option. - Some options have short, single-character names. Often these are
aliases for long commands, (such as
-n <number>instead of--max-count=<number>), but sometimes the option exists in short-form with no long-form equivalent, (such as-p). [XXX: It wouldn't hurt to fix this by adding--patch, etc. right?] Long options start with two dashes (e.g.
--max-count), while short options start with one (e.g.-n).Option naming and usage is consistent across commands. For example, every command that lets you specify a commit identifier or range will accept the same expressions, (HEAD~3, origin..master, 72d4f10e, etc), while any command that can be limited by paths will accept the same expressions ("-- doc/ some-file.c"), etc.
Many commands that print output of some kind can be made more quiet by passing the -q or --quiet options.
2.6 Making and reviewing changes
Now that we have a grasp of viewing history in git, let’s take a look at making some changes and examining them. You should be working within the "hello" directory that we originally cloned.
In the repository, we have a file hello.c that contains the classic “hello, world” program. But this program currently has a syntax error and won't compile, (there's a missing 'n' between the '\' and the '"' on the line containing printf). Let's fix that now. You can use a text editor to correct the file, or you can copy-and-paste the sed command below:
$ sed -i '/printf/s/\\"/\\n"/' hello.c
After you've made that change, the “git status” command will tell you what git knows about the files in the repository.
$ ls
hello.c  Makefile
$ git status
# On branch master
# Changed but not updated:
#   (use "git add <file>..." to update what will be committed)
#
#       modified:   hello.c
#
no changes added to commit (use "git add" and/or "git commit -a")
First "git status" tells us that the current branch is "master". This means that the master branch is what will be updated when we create a new commit.
Note: In git a branch is a very simple notion---it's simply a name that points to a particular commit, (literally nothing more than a pointer---look at the contents of .git/refs/heads/master if you're curious). The fact that a branch is so light is what makes the creation of new branches an instantaneous operation in git. Together with the ease of merging, git makes branches a joy to work with. But we'll delay talk of branching and merging to a future chapter.
Next “git status” prints a line with "modified" for each modified file---in this case just hello.c. The “git status” command will not print any output for files that have not been modified.
Notice that we didn’t need to inform git that we were going to modify the file before we started, or that we had modified the file after we were done; it was able to figure this out itself.
It’s a little bit helpful to know that we’ve modified hello.c, but we might prefer to know exactly what changes we’ve made to it. To do this, we use the “git diff” command.
$ git diff
diff --git a/hello.c b/hello.c
index 9a3ff79..ea364d3 100644
--- a/hello.c
+++ b/hello.c
@@ -7,6 +7,6 @@

 int main(int argc, char **argv)
 {
-       printf("hello, world!\");
+       printf("hello, world!\n");
        return 0;
 }
2.7 Recording changes in a new commit
We can modify files, build and test our changes, and use “git status” and “git diff” to review our changes, until we’re satisfied with what we’ve done and arrive at a natural stopping point where we want to record our work in a new commit.
If you'd like, go ahead and build the program now with "make" and run it to ensure it works. Everything should look good so we're just about ready to make a commit. Unsurprisingly, we'll be using "git commit" to do this.
2.7.1 Introducing yourself to git
Before you run "git commit" though, you should introduce yourself to git. Git records your name and email address with each change that you commit, (as both author and committer unless you tell it otherwise), so that you and others will later be able to tell who made each change.
Git tries to automatically figure out a sensible name and address to attribute to both author and committer if you haven't explicitly told it a name and address. And it tries a lot, (detailed below). If you're not interested in these details, you might want to skip to the next section which explains how to avoid all this guesswork and tell git what your name and email address are.
Here is a list of all the guessing that git will attempt. It will attempt each of the following methods, in order, (stopping for each of the author and committer name and email as soon as a value is found):
- If you specify a --author option to the “git commit” command on
the command line, followed by a
"Real Name <email@example.com>"string, then this name and addresss will be used for the author fields. The committer fields will still be determined as below. This option is very helpful for when applying a commit originally authored by someone other than yourself. - If any of the
GIT_AUTHOR_NAME,GIT_AUTHOR_EMAIL,GIT_COMMITTER_NAME, orGIT_COMMITER_EMAILenvironment variables are set, then those values will be used for the corresponding fields. - If you have a file in your home directory called .gitconfig, with name or email settings in the [user] section, then these values will be used to set any remaining author and committer fields. For more details on the contents of this file, refer to section 2.7.1 below.
- If you have a file in the local repository called .git/config, again with name or email settings in the [user] section, then these values will be used to set any remaining author and committer fields.
- If you have set the
EMAILenvironment variable, this will be used to set author and committer email addresses if still unset. - git will query your system to find out your real name from available GECOS field and your username, hostname, and domain to construct an email address, (or at least an identifier resembling an email address).
If all of these mechanisms fail, "git commit" will fail, printing an error message instructing you how to use "git config" to tell git your name and email address.
You should think of the GIT_AUTHOR/COMMITER_NAME/EMAIL environment
variables and the --author option to the “git commit” command as ways
to override git’s default selection. For normal use, the simplest and
most robust way to set your information is by creating a .gitconfig
file, (either manually or with the "git config" command); see below
for details.
Creating a git configuration file
To set your name and email address, just use the following commands:
git config --global user.name "Your Name"
git config --global user.email "you@example.com"
The --global option means that this command will set global information, (affecting all repositories on this machine), in the .gitconfig file in your home directory. Alternately, you could omit the --global which would make the change take effect only in the local repository. This is convenient if you want to have different email addresses associated with different projects, for example.
Of course, git's configuration file is a simple-to-edit plain-text file, so instead of using the above commands, you can also just edit the files directly. Use your favorite editor to create a file called .gitconfig in your home directory, (or if you ran the above commands then it will be there already). The initial contents of your .gitconfig should look like this.
# This is a git configuration file.
[user]
    name = Your Name
    email = you@example.com
Similarly, you can make a repository-specific configuration by editing .git/config in the local repository. It will already have some sections present, (created by the "git clone"), just add a [user] section as above.
The “[user]” line begins a section of the config file, so you can read the “name = ...” line as meaning “set the value of the name item in the user section”. This is the same notion expressed with the "user.name" syntax on the git-config command line. A section continues until a new section begins, or the end of the file. Git ignores empty lines and treats any text from “#” to the end of a line as a comment.
Choosing your name and email
You can use any text you like as the value of the name and email configuration items, since this information is for reading by other people, not for interpreting by git. It is conventional to use your actual name as well as a valid email address. But some people, (notably Linus Torvalds, the original author of git), actually like the default username@hostname convention that git falls back on without any additional information about an email address. There's no requirement that the email address actually be valid, and perhaps it's useful to be reminded which machine was used to create particular commits. So choose the name and email you wish, or follow a particular project's conventions.
2.7.2 Writing a commit message
When we commit a change, git drops us into a text editor to enter a message that will describe the modifications we’ve made in this commit. This is called the commit message. It will be a record for readers of what we did and why, and it will be printed by “git log” after we’ve finished committing.
$ git commit -a
Note: The -a on the command-line instructs git to commit the new
content of all tracked files that have been modified. This is a
convenience over explicitly listing filenames to be committed on the
git commit command line. It is useful to use git commit <files>
when there is a need to commit only some subset of the files that have
been modified.
If new files need to be committed for the first time, just use git
add <file> before git commit -a. If a file needs to be removed,
just remove it as normal before committing and git commit -a will
notice that---it does not need to be explicitly told about the
removal.
The editor that the git commit command drops us into will contain an
empty line, followed by a number of lines starting with “#”. These
lines contain the same information as seen in git status before:
empty line
# Please enter the commit message for your changes.
# (Comment lines starting with '#' will not be included)
# On branch master
# Changes to be committed:
#   (use "git reset HEAD <file>..." to unstage)
#
#       modified:   hello.c
#
# Untracked files:
#   (use "git add <file>..." to include in what will be committed)
#
#       hello
#       hello.o
Notice that two untracked files (hello and hello.o) have now appeared from the build process. Git is reminding us of these in case we intended to commit them as well, (in which case we would need to "git add" them). We don't actually want to commit these files so we will ignore them for now, (and we could tell git to ignore them as well by listing them in a .gitignore file).
Git will ignore all lines in the commit message that start with “#”; it uses them only to give us information on the commit. Modifying or deleting these lines has no effect.
2.7.3 Writing a good commit message
A good commit message will generally have a single line that summarizes the commit, a blank line, and then one or more paragraphs with supporting detail. Since many tools only print the first line of a commit message by default, it’s important that the first line stands alone.
One example of a first-line-only viewer is "git log --pretty=short". Other examples include graphical history viewers such as gitk and gitview, and web-based viewers such as gitweb and cgit.
Here’s a real example of a commit message that doesn’t follow this guideline, and hence has a summary that is not readable.
$ git log --pretty=short
commit 3ef5535144da88a854f7930503845cd44506c2e2
Author: Censored Person <censored.person@example.org>

    include buildmeister/commondefs.   Add an exports and install
As far as the remainder of the contents of the commit message are concerned, there are no hard-and-fast rules. git itself doesn’t interpret or care about the contents of the commit message, though your project may have policies that dictate a certain kind of formatting.
My personal preference is for short, but informative, commit messages that tell me something that I can’t figure out with a quick glance at the output of "git log --stat" or “git log -p", (so repeating the list of all modified files is not useful, for example).
To follow along with the example here, go ahead and type something like the following sentence into the editor. The misspelling here is intentional. You'll see how to fix that up after the fact in just a moment:
Fixed the typo so the program actuall complies now.
Then save the file, and exit from the editor. When you do that, git will create the commit.
2.7.4 Aborting a commit
If you decide that you don’t want to commit while in the middle of editing a commit message, simply exit from your editor without saving the file that it’s editing. This will cause nothing to happen to either the repository or the working directory.
2.7.5 Admiring our new handiwork
Once we’ve finished the commit, we can use the “git show” command to display the commit we just created. As discussed previously, this command produces output that is identical to “git log -p”, but for only a single revision, (and the most recent revision by default):
$ git show
commit fd21e5d6c5eedee70137229ebf348c25181812ab
Author: Carl Worth <cworth@cworth.org>
Date:   Fri Sep 28 12:50:16 2007 -0700

    Fixed the typo so the program actuall complies now.

diff --git a/hello.c b/hello.c
index 9a3ff79..ea364d3 100644
--- a/hello.c
+++ b/hello.c
@@ -7,6 +7,6 @@

 int main(int argc, char **argv)
 {
-       printf("hello, world!\");
+       printf("hello, world!\n");
        return 0;
 }
Note that you will not see the same commit identifier for your commit, even if the change you made is identical to mine. The commit identifier incorporates not only the contents of the files, but commit message, the author and committer names and emails, and the author and commit dates. (OK, so now you probably know enough to be able to guess the right command to produce a commit with exactly the commit identifier shown above. Can you do it?)
2.7.6 Fixing up a broken commit (before anyone else sees it)
So now that we've cloned a local repository, made a change to the code, setup our name and email address, and made a careful commit, we're just about ready to share our change with the world. But wait, that commit message has that embarrassing misspelling in it. Wouldn't it be nice to touch that up before we post this commit with a never-to-be-changed again commit identifier?
This is the exact situation for which "git commit --amend" was invented. So you can just run that now and fix the broken commit message in the editor:
$ git commit --amend
Here's the final result:
$ git show
commit 3c54ac672ec1130b36837f1b708054a7a1d402de
Author: Carl Worth <cworth@cworth.org>
Date:   Fri Sep 28 12:50:16 2007 -0700

    Fixed the typo so the program actually compiles now.

diff --git a/hello.c b/hello.c
index 9a3ff79..ea364d3 100644
--- a/hello.c
+++ b/hello.c
@@ -7,6 +7,6 @@

 int main(int argc, char **argv)
 {
-       printf("hello, world!\");
+       printf("hello, world!\n");
        return 0;
 }
Note that we didn't use "commit -a" this time. This means that "git commit --amend" will amend only the commit message and not any of the actual files being tracked, (even if some of them had been modified between the commits).
It's also possible to use "git commit -a --amend" to similarly fix up mistakes noticed in code. That will replace the most recent commit with a different commit based on any new changes to files.
I do feel a little hesitant to mention "git commit -a --amend". It's a handy command for fixing up something like a misspelling in a comment in the code. But if there is anything more significant than that, then it would generally be better to create an additional commit rather than amending an existing commit. This is important for several reasons:
The amend operation will destroy a state that was previously saved in a commit. If it's just the commit message being changed, then that's no big deal. But if the contents are being amended, then a mistake could eliminate something valuable.
All commits should be logically independent and as small as possible. Abusing "git commit -a --amend" can cause a small commit to grow and acquire unrelated changes.
It's worth emphasizing the value of minimal, independent commits. The smaller the changes are the more useful the history will be when actually using the history, not just viewing it. This is particularly important when doing "git bisect"---that's a powerful tool for isolating a single commit that introduces a bug. And it's much more helpful when the commit it isolates is as small as possible.
One advantage of using git over some other systems is that the commit speed is blazingly fast. The tool doesn't punish you at all for committing every time your project is in a state worth saving. "Commit early, commit often" is a well-supported mode of operation with git.
2.8 Sharing changes
We mentioned earlier that repositories in git are self-contained. This means that the commit we just created exists only in our hello repository. Let’s look at a few ways that we can propagate this change into other repositories.
2.8.1 Pulling changes from the original repository
Recall that in Section 2.3.2 we made several local clones of the hello repository before we made any commits. This allows us to simulate what happens when upstream changes have been committed after you originally cloned.
The simplest, (and quite common), scenario is that you inherently trust any changes in the original repository and you want to pull these directly into your clone. This might be the case if you are using git simply to track the progress of a project without making any changes.
In this case, the operation is as simple as just calling "git pull":
$ cd ../hello-pull
$ git pull
remote: Generating pack...
Unpacking 3 objects...
 100% (3/3) done
remote: Done counting 5 objects.
Result has 3 objects.
Deltifying 3 objects...
 100% remote: (3/3) done
Total 3 (delta 1), reused 0 (delta 0)
* refs/remotes/origin/master: fast forward to branch 'master' of /tmp/hello
  old..new: a1a0e8b..3c54ac6
Updating a1a0e8b..3c54ac6
Fast forward
 hello.c |    2 +-
 1 files changed, 1 insertions(+), 1 deletions(-)
XXX: Git is fairly noisy here, but a user has little need to care about the several stages of operation involved here. As a tutorial writer I'd like to say "ignore all that progress stuff, and look at where the stat information starts" but it's hard for a new user to even be able to understand that. I think it would be ideal if all of the progress-tracking spew were reduced to a single line. Something like "Computing (100%) Transferring (100%)" or whatever.
After (lots!) of progress indication, git gives a report of which files were modified, (which is very useful for getting a quick feel for what happened). If you would like more details on what changes came in, git provides a range that is perfect for examining. Let's take a look (again, the commit identifiers will be different for you --- just copy-and-paste the range that git prints):
$ git log a1a0e8b..3c54ac6
commit 3c54ac672ec1130b36837f1b708054a7a1d402de
Author: Carl Worth <cworth@cworth.org>
Date:   Fri Sep 28 12:50:16 2007 -0700

    Fixed the typo so the program actually compiles now.
As expected, we received just the one commit.
So that's all that's needed in the common case. Just run "git pull" everytime you want to pull in new changes that have landed in the upstream repository.
Note: Mercurial users who are reading this might wonder if there's a need for the equivalent of "hg update" after doing a "git pull". And the answer is no. Unlike mercurial, "git pull", (and "git merge") will automatically update the working-directory files as necessary.
2.8.2 Using fetch and merge separately to pull
Sometimes you may not know if you want to pull in the changes from the remote repository or not. It's useful to be able to examine them before accepting them into our branch. The "git pull" command shown in the previous section is conceptually the combination of two commands, "git fetch" and "git merge". We can use these commands separately to examine the change before accepting it.
So let's do that within the hello-fetch clone we made earlier. First we will do the fetch:
$ cd ../hello-fetch
$ git fetch
remote: Generating pack...
Unpacking 3 objects...
remote: Done counting 5 objects.
Result has 3 objects.
Deltifying 3 objects...
 100% remote: (3/3) done
Total 3 (delta 1), reused 0 (delta 0)
 100% (3/3) done
* refs/remotes/origin/master: fast forward to branch 'master' of /tmp/hello/
  old..new: a1a0e8b..3c54ac6
You may notice that the output here looks very much like the first portion of the output from "git pull". This is no coincidence. The new changes have been "fetched" into the current repository and are stored into "origin/master" and have not been into the current "master" branch. Remember that "master" is our current branch. So now, "origin/master" is the state of the master branch that exists in the "origin" repository, (the one we cloned from).
The most convenient way to examine the fetched changes is with the "master..origin" range notation:
$ git log master..origin
commit 3c54ac672ec1130b36837f1b708054a7a1d402de
Author: Carl Worth <cworth@cworth.org>
Date:   Fri Sep 28 12:50:16 2007 -0700

    Fixed the typo so the program actually compiles now.
Another helpful way of visualizing what happened with "git fetch" here is to run "gitk --all", which gives a graphical representation of all branches. Here is what it would look like:
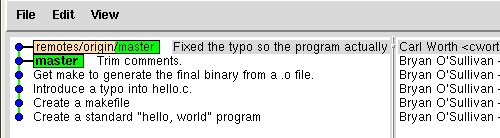
Notice that origin/master points to a single commit that was committed on top of the state pointed to by the "master" branch.
Let's assume we are happy with the changes and we want to include them into our master branch. To do this we simply run "git merge origin":
$ git merge origin
Updating a1a0e8b..3c54ac6
Fast forward
 hello.c |    2 +-
 1 files changed, 1 insertions(+), 1 deletions(-)
Again, you'll see that this precisely matches the final portion of the output from "git pull". Using "git fetch" and "git merge" let us achieve exactly what "git pull" did, but we were able to stop in the middle to examine the situation, (and we could have decided to reject the changes and not merge them---leaving our master branch unchanged).
On merges and "fast forward"
You'll notice that we've been seeing the phrase "fast forward" several times. This is a special-case operation performed by "git merge" where a branch can be advanced along a linear sequence. This happens whenever you pull changes that build directly on top of the same commit you have as your most recent commit. In other words, there was never any divergence or simultaneous commits created in parallel in multiple repositories. If there had been parallel commits, then "git merge" would actually introduce a new merge commit to tie the two commits together.
When a non-fast-forward merge occurs, there is always the possibility that a conflict occurs. In this case, "git merge" will leave conflict markers in the files and instruct you to resolve the conflicts. When you are finished, you would issue a "git commit -a" to create the merge commit.
2.8.3 Using "git remote" to pull changes from other repositories
We've already described how "git pull" will pull in changes from the repository which was the origin of the clone operation. Git also provides excellent support for pulling changes from any other repository as well, (distributed, rather than centralized development).
If you have a situation where you want to pull a single time from some repository, then you can simply give the path or URL of the repository on the "git pull" command line. However, it's often the case that if you want to pull changes from a repository once, you'll want to pull changes from that same repository again in the future. This is where the "git remote" notion is extremely useful---it allows you to associate simple names, (and behaviors), with remote repository URLs
We've already seen one instance of "git remote" which is the creation of the "origin" remote which happens automatically during "git clone". Let's now create another. Let's assume you are going to be working in the hello-remote repository and you'd like to pull changes from the hello-pull repository, where your friend "fred" has been making changes. Here's how to setup the new remote:
   $ cd ../hello-remote
   $ git remote add fred ../hello-pull
So that's a "git remote add" command line followed by an arbitrary name you'd like for the new remote (fred) and the URL of the remote (../hello-pull). Obviously, the URL could be a git:// URL or any other git-supported URL in addition to a local path.
The "git remote" command is really just a helper for adding some entries to the .git/config file. You might find it more convenient to edit that file directly once you get comfortable with things.
At this point the name "fred" will work much like the name "origin" has worked in previous examples. For example, we can fetch the changes fred has made with "git fetch fred":
$ git fetch fred
remote: Generating pack...
Unpacking 3 objects...
remote: Done counting 5 objects.
Result has 3 objects.
Deltifying 3 objects...
 100% remote: (3/3) done
Total 3 (delta 1), reused 0 (delta 0)
 100% (3/3) done
* refs/remotes/fred/master: storing branch 'master' of ../hello-pull
  commit: 3c54ac6
Notice that this command-line only differs from the "git fetch" we did previously by explicitly naming which remote should be fetched. We could have explicitly said "git fetch origin" earlier.
We can also list all known remote-tracking branches with "git branch -r":
$ git branch -r
  fred/master
  origin/HEAD
  origin/master
These remote-tracking branches make it very easy to collaborate with people as they are working on experimental features not yet ready for upstream inclusion. For example, if fred's latest code is still trashing filesystems then he might not want to push it out to the project's primary repository. But he may still want my help with it. So he can push it to a branch in his own repository for which I've got a remote. Then on my next "git fetch fred" I might notice a new branch called fred/trashes-filesystems and I can examine his code with a command such as "git log ..fred/trashed-filesystems".
So lots of side collaboration can go on easily, and people working only with the primary repository never even have to see this dangerous code. It's distributed development at its finest.
2.8.4 Checking out previous revisions
It's often useful to examine the working-tree state of some specific revision other than the tip of some branch. For example, maybe you would like to build a particular tagged version, or maybe you'd like to test the behavior of the code before a particular change was introduced. To do this, use "git checkout" and pass it the name of any revision, (with a branch name, a tag name, or any other commit identifier). For example, to examine our project before the original typo was introduced:
$ git checkout 0a633bf5
Note: moving to "0a633bf5" which isn't a local branch
If you want to create a new branch from this checkout, you may do so
(now or later) by using -b with the checkout command again. Example:
  git checkout -b <new_branch_name>
HEAD is now at 0a633bf... Create a makefile
The note that git gives us is to indicate that we are checking out a non-branch revision. This is perfectly fine if we are just exploring history, but if we actually wanted to use this revision as the basis for new commits, we would first have to create a new branch name as it describes.
If we were to use "git checkout" with a branch name, then that would change the current branch, (meaning that any new commits would advance that branch pointer).
For now, let's return back to the tip of the master branch by just checking it out again:
$ git checkout master
Previous HEAD position was 0a633bf... Create a makefile
Switched to branch "master"
2.8.5 Pushing changes to another repository
As an unsurprising parallel to "git pull", git also provides "git push" for pushing changes to another repository. Now, generally the purpose of pushing to a repository is to have some "collaboration point" where potentially multiple people might be pushing or pulling. Because there might be multiple people pushing into the repository at any point, it wouldn't make sense to have a working-directory associated with this repository.
For this, git has the notion of a "bare" repository, which is simply a repository with no working directory. Let's create a new bare repository and push some changes into it:
$ cd ..
$ mkdir hello-bare
$ cd hello-bare
$ git --bare init --shared
The --shared option sets up the necessary group file permissions so that other users in my group will be able to push into this repository as well.
Now lets return to our hello repository and push some changes to this new repository. Since this is our very first push into this repository we need to tell git which branches to push. The easiest way to do this is to use --all to indicate all branches:
$ cd ../hello
$ git push ../hello-bare --all
updating 'refs/heads/master'
  from 0000000000000000000000000000000000000000
  to   3c54ac672ec1130b36837f1b708054a7a1d402de
Generating pack...
Done counting 18 objects.
Deltifying 18 objects...
 100% (18/18) done
Writing 18 objects...
 100% (18/18) done
Total 18 (delta 3), reused 15 (delta 2)
Unpacking 18 objects...
 100% (18/18) done
refs/heads/master: 0000000000000000000000000000000000000000 -> 3c54ac672ec1130b36837f1b708054a7a1d402de
For subsequent pushes we don't need to specify --all as "git push" by default pushes all branches that exist in both the local and remote repositories. Also, as with pull, instead of explicitly specifying a URL, you may also specify a remote to push to. And by default, after cloning a repository, "git push" with no other arguments will attempt to push back to the same origin repository. As this is often exactly what is wanted, you may find that "git push" alone is often exactly what you need.
What happens if we try to pull or push changes and the receiving repository already has those changes? Nothing too exciting.
$ git push ../hello-bare
Everything up-to-date
Appendix D
Open Publication License
Version 1.0, 8 June 1999
D.1 Requirements on both unmodified and modified versions
The Open Publication works may be reproduced and distributed in whole or in part, in any medium physical or electronic, provided that the terms of this license are adhered to, and that this license or an incorporation of it by reference (with any options elected by the author(s) and/or publisher) is displayed in the reproduction.
Proper form for an incorporation by reference is as follows:
Copyright (c) year by author’s name or designee. This material may be distributed only subject to the terms and conditions set forth in the Open Publication License, vx.y or later (the latest version is presently available at [http://www.opencontent.org/openpub/][http://www.opencontent.org/openpub/]).
The reference must be immediately followed with any options elected by the author(s) and/or publisher of the document (see section D.6).
Commercial redistribution of Open Publication-licensed material is permitted.
Any publication in standard (paper) book form shall require the citation of the original publisher and author. The publisher and author’s names shall appear on all outer surfaces of the book. On all outer surfaces of the book the original publisher’s name shall be as large as the title of the work and cited as possessive with respect to the title.
D.2 Copyright
The copyright to each Open Publication is owned by its author(s) or designee.
D.3 Scope of license
The following license terms apply to all Open Publication works, unless otherwise explicitly stated in the document.
Mere aggregation of Open Publication works or a portion of an Open Publication work with other works or programs on the same media shall not cause this license to apply to those other works. The aggregate work shall contain a notice specifying the inclusion of the Open Publication material and appropriate copyright notice.
Severability. If any part of this license is found to be unenforceable in any jurisdiction, the remaining portions of the license remain in force.
No warranty. Open Publication works are licensed and provided “as is” without warranty of any kind, express or implied, including, but not limited to, the implied warranties of merchantability and fitness for a particular purpose or a warranty of non-infringement.
D.4 Requirements on modified works
All modified versions of documents covered by this license, including translations, anthologies, compilations and partial documents, must meet the following requirements:
- The modified version must be labeled as such.
- The person making the modifications must be identified and the modifications dated.
- Acknowledgement of the original author and publisher if applicable must be retained according to normal academic citation practices.
- The location of the original unmodified document must be identified.
- The original author’s (or authors’) name(s) may not be used to assert or imply endorsement of the resulting document without the original author’s (or authors’) permission.
D.5 Good-practice recommendations
In addition to the requirements of this license, it is requested from and strongly recommended of redistributors that:
- If you are distributing Open Publication works on hardcopy or CD-ROM, you provide email notification to the authors of your intent to redistribute at least thirty days before your manuscript or media freeze, to give the authors time to provide updated documents. This notification should describe modifications, if any, made to the document.
- All substantive modifications (including deletions) be either clearly marked up in the document or else described in an attachment to the document.
- Finally, while it is not mandatory under this license, it is considered good form to offer a free copy of any hardcopy and CD-ROM expression of an Open Publication-licensed work to its author(s).
D.6 License options
The author(s) and/or publisher of an Open Publication-licensed document may elect certain options by appending language to the reference to or copy of the license. These options are considered part of the license instance and must be included with the license (or its incorporation by reference) in derived works.
To prohibit distribution of substantively modified versions without the explicit permission of the author(s). “Substantive modification” is defined as a change to the semantic content of the document, and excludes mere changes in format or typographical corrections.
To accomplish this, add the phrase “Distribution of substantively modified versions of this document is prohibited without the explicit permission of the copyright holder.” to the license reference or copy.
To prohibit any publication of this work or derivative works in whole or in part in standard (paper) book form for commercial purposes is prohibited unless prior permission is obtained from the copyright holder.
To accomplish this, add the phrase “Distribution of the work or derivative of the work in any standard (paper) book form is prohibited unless prior permission is obtained from the copyright holder.” to the license reference or copy.